I’m not big on new year’s or birthday resolutions, but there was one big hurdle I wanted to jump before turning 30: my fear of worms. I’ve been absolutely disgusted by earthworms ever since my older cousins put them down my shirt when I was five. With a little encouragement from some gardening pals, I’ve become Sunset Park’s newest worm herder.

Vermiculture is using worms to compost kitchen, garden, and household waste. It turns stinky trash into nutrient-rich, fresh-smelling worm castings that can be added to potted plants or gardens. If you pay for your trash collection it will lower your costs and, whether you pay or not, reducing the amount of methane-producing food that goes to landfills is good for everyone. While traditional compost requires a large, outdoor space, vermicompost can be housed in a tiny Brooklyn kitchen. And although a worm or two might get antsy and make a wiggle for it when they’re getting used to their new space, once they’re established, no one will ever know they’re around.
Building a Compost Bin
The first step to starting your own vermicompost situation is finding a bin. Don’t even think about buying one – it’ll cost you at least $100. Making a bin is ridiculously easy. All you need is 3 identical dark plastic containers (5-15 gallons), 1 lid, a drill, and a 1/4 inch drill bit.
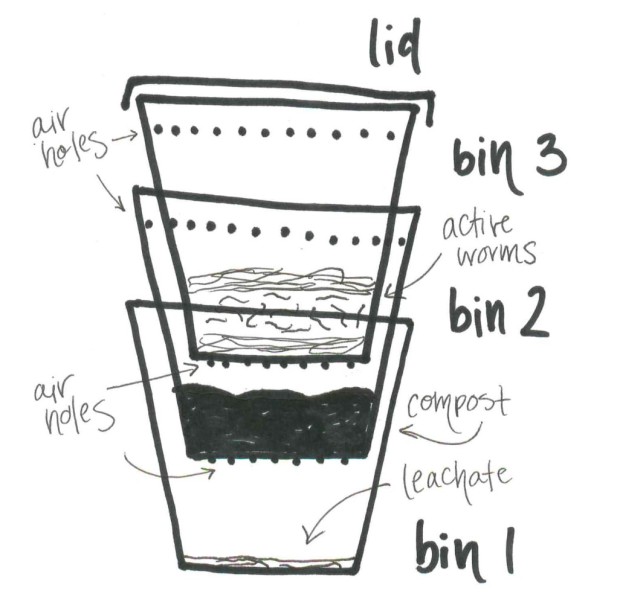
I use a tiered system which ensures that the worms have the right amount of moisture and lets the worms do the sorting for me. Here’s the idea:

The bottom bin (bin 1) has no holes so that it can catch liquid and any worms that get too close to the bottom.
Stacked on top of it is a bin with holes (bin 2). The bottom holes allow excess moisture to drain out while keeping the compost humid. The top holes allow for fresh air to flow through the bin. This is the bin where worms live, are fed, and actively compost.
Once bin 2 is 1/4 full of castings, a second holey bin (bin 3) is stacked on top. The bin now becomes the active bin. Over a period of about 2 months, the worms will migrate from bin 2 to bin 3 through the holes. The castings left behind in bin 2 are now ready to be used without me taking any time to remove the worms from the dirt.
When bin 3 is 1/4 full of castings, bin 2 can be stacked on top and the whole cycle begins again.
+ + +
To make bins 2 and 3, drill 1/4″ holes every 2″ all over the bottom of each bin. Then measure 2″ down from the top of the bins and draw a line. Drill 1/4″ holes along this line every 2″. It’s not important to be incredibly accurate – I taught a class of 12-year-old girls how to use a drill and let them punch all the holes they wanted.
Starting a Worm Farm
Create bedding
Once you have a bin ready, it’s time to start your farm. You’ll need black-and-white newspaper (some colored inks can be toxic for worms). Tear the pages into 1/2″ strips and fill bin 2 half full (never half empty!).
Spray the newspaper with water until it feels like a wrung-out sponge. It shouldn’t be soaking, but fluffy so that oxygen can get to the worms. Add a cup of soil from your garden or from a pot. This introduces friendly microorganisms and grit into the environment. Worms collect these bacteria, protozoa, and tiny rocks in their gizzards; it’s gizzards, not teeth, that grind waste down into castings.
Get yourself some worms
Now you need worms. I compost with red wigglers (Eisenia fetida) because they eat and reproduce quickly, don’t mind being moved around, and burrow shallowly. If you live in New York, you can get worms from the Lower East Side Ecology Center. If you’re farther away, check out local garden suppliers, talk to organic farms or schools with gardens to see if they can give you some worms, or order online from Uncle Jim’s.
Caring for worms
Once you get the hang of it, caring for your worms easy – there’s a good reason some environmentally-minded elementary school classrooms care for worms. If things start going awry, a few adjustments should put your bin back in a state of balance. Brooklyn Botanical Garden has a great trouble-shooting guide for beginners.
Find a good place for your bins
Worms live underground which is why they like being in dark, cool, damp places.
The day you introduce worms to the bin, bury a bit of food and leave the lid off for a few hours. The worms will quickly bury down, away from the sunlight. After they’ve moved into the bedding, put the lid on and store the bin.
Store your bin somewhere where the temperature will be between 55-75ºF / 13-24ºC and where moisture won’t evaporate too quickly. Keep your bin away from windows, heaters, and ovens. Closets and the cupboard under the kitchen sink work well because you can check on your worms every day.
Feed your worms
Worms will each half of their body weight every day. That means that a pound of worms will eat 0.5 pound of scraps a day or 3.5 pounds a week. If you notice that your bins are starting to smell, slow down on the feeding. Bad smells are caused by rotting food that worms haven’t eaten; a healthy environment will smell fresh and earthy.
Before feeding scraps to your worms, cut them into small pieces to create a larger surface area for feeding. Bury the scraps underneath newspaper or castings so that fruit flies and other pests aren’t attracted to the bin. I feed at a different location every time to keep the whole bin active.
Worms need both “greens” – nitrogen-containing fresh food and garden scraps – and “browns” – carbon-containing newspaper, dried leaves, and cardboard. Each time you feed your worms, make sure there’s a good balance of greens and browns. In addition to feeding the worms, browns help regulate moisture that seeps out of greens.

photo by Julia Wang
Worms eat:
- Vegetable and fruit scraps – including seeds, although they might sprout
- Egg shells
- Coffee grounds
- Tea leaves
- Plant waste
- Breads and grains – including moldy bread
- Unbleached, undyed paper – cardboard, egg cartons, newspaper
- Dead worms
Worms don’t eat:
- Onion and garlic – the smell can be overpowering for a kitchen
- Meat, bones, and dairy – these take too long to break down and can attract pests
- Oil – oil takes too long to break down and can attract pests
- Citrus – the acid will kill the worms
- Salt – salt will kill worms
- Pet waste – animal waste will create a heat that will kill worms
- Non-organic materials – plastic, glass, metal, rock
Keep the environment nice and wet
Worms bodies are about 90% water. For worms to stay happy and healthy, moisture in their bin should be above 50%.
Not enough moisture will cause worms to dry out and die. While some folks will spray water in their bins, it’s often easier and less wasteful to puree a bit of a moisture-rich food scrap in a food processor and adding the liquid to the bin.
Too much moisture will down the worms. Gently fluff the castings every time you feed to ensure that there is fresh airflow.
Watch for signs of life
Worms will live for about a year in a compost bin. When they die, they will become part of the compost. Although each worm produces both eggs and sperms, reproduction still requires two buddies. If conditions are right in your bin, worms will lay cocoons that will hatch new baby worms. By recording how much and how often your worms are eating, you can get a good idea of how fast they’re reproducing and can adjust feeding and moisture to create a better environment.
It’s normal to see worms of all ages as well as other organisms in your bin. They won’t try to escape and move into another part of your house because everything they need is right there in the bin.
How to use vermicompost
Your hard-working worms will provide you with both liquid fertilizer and castings.
You can harvest leachate from bin 1 at any time to make fertilizer. Because has not passed through the worm’s digestive systems, it may contain harmful microorganisms. However, it can also contain valuable bacteria. Dilute the leachate in water using 10 g of water for every 1 g of leachate. You can spray this on outdoor, non-edible plants.
Once castings turn dark brown, the vermicompost can be used. Vermicompost feeds plants and helps fight of disease. It can be used as a soil amendment in gardens or pots at a 1:4 ratio of vermicompost to soil. It can be used to start seeds at a 1:1 ratio of vermicompost to soil. Stored in a cold, dark place, it will last for up to a year before the beneficial microbes die out.
You can use castings to create “worm tea,” another kind of liquid fertilizer, by soaking worm compost in clan water, add a tiny bit of sugar to feed the microbes, and shaking up the water to introduce oxygen. The aerobic microbes out-compete harmful organisms in plants, boosting the plant’s immune system.

photo by Julia Wang
