
You’ve got a starter, some math knowledge, and all your ingredients and materials pulled together. It’s time to learn the final step: how to build and bake a loaf.

Levain
Some bakers build a separate levain (which is just the fancy french word for “starter” and is typically used to refer to the bit of starter you add to a dough) each time they bake. This can be convenient if you’re keeping a “stiff” starter that needs to be watered down before adding it to your dough, if you keep a very small amount of starter in your fridge, or if you’re going for a consistent flavor each time. None of these apply to me, so I just get my starter going nice and strong each time I want to bake and pull my levain directly from it.

To check if your levain is ready for baking, scoop a small spoonful into a bowl of water to see if it floats. If it stays at the top, there’s enough yeasty activity to get your dough rising. If it sinks, feed it and test again in about two hours.
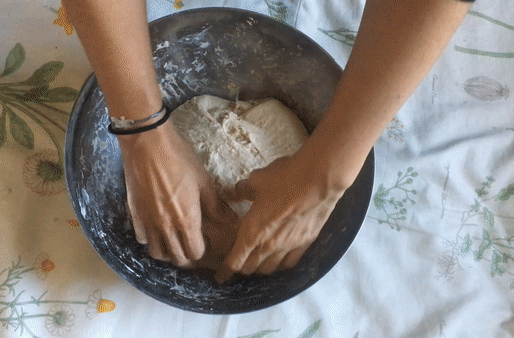
Initial Mix
At its simplest, dough is a mixture of water, gluten and starch. Starch makes up the bulk of the dough while gluten forms a smaller proportion. You can get a better idea of what each part feels like by mixing cornstarch and vital gluten each separately with water. While starch is tacky, gluten is super elastic. Both starch and gluten are polymers, although starch is a carbohydrate while gluten is a protein.
Mix your dough just enough so that all the flour is wet, then move on to autolyse.
Autolyse
The autolyse (“auto-leez”) method was invented by Professor Raymond Calvel in the mid twentieth century. The big secret he discovered? The best bread comes from doing less work. See, intense kneading exposes dough to oxygen, ruining carotenoids in flour. Since carotenoids lend a good amount of color and flavor to dough, this isn’t a good thing!
To understand why autolyse is so important, we have to talk about gluten formation and the role it plays in baking. In the presence of yeast and oxygen and with a little dough movement, two amino acids that naturally occur in wheat – Glutenin and Gliadin – form together to make very long chains called gluten. These long gluten chains are a lot like balloons: they stretch when pulled and spring back into shape after you let go. Think about the difference between low-gluten pie crust and high-gluten bread dough. Pie crust is made with the tiniest amount of water and just barely enough mixing to form a homogenous dough. Without kneading and yeast, gluten is unable to form and the dough remains crumbly. Pull on a good piece of bread dough, though, and it will stretch thin enough for you to see the sun shine through.

At the same time that gluten is forming, yeast and lacto-bacteria are feeding on the starch in flour. Being living things, the microflora have to give off waste. In this case, the lacto-bacteria gives off delicious lactic acid and yeast burps out carbon dioxide and alcohol. Gluten, being an elastic balloon, catches the gas given off by yeast and traps it in bubbles. This causes the dough to rise (and is why gluten-free bread often has the approximate texture of a brick).
If kneading it what helps gluten form, why not simply stick our sourdough in a stand mixer for 15 minutes and be done with it? Well, when dough is kneaded, it become hard to work with. If we can mix metaphors for a second, think of gluten strands as telephone cords. When gluten is produced too quickly, all the telephone cords get tangled up. Tangled-telephone-cord gluten not only requires superhero-level strength to knead, it also fails to rise as the gas produced by yeast isn’t strong enough to cause the gluten to expand.
Enter autolyse. Autolyse relies on autolysis – the destruction of cells through their own enzyme action – to create a tender loaf. When flour and water are mixed, an enzyme called protease is activated. Protease goes around splitting Glutenin and Gliadin and lining them up so that they’re ready to form orderly gluten strands when the time comes. After a short time, the protease has done its job and we can begin gently folding the dough so that gluten forms in nice, long, unjumbled chains.

Autolyse has a few other benefits as well. By combining only the water and flour (or water, flour, and levain), the flour can absorb as much moisture as possible without salt interfering. If we’re using whole grains like whole wheat or dark rye, autolyse given the bran a chance to soften so that it doesn’t slice through the gluten strands that we’re about to create.
Autolyse can take anywhere from half an hour to two hours, depending on the recipe. High-protein flours like bread flour will benefit from an extended autolyse, as well as rough flours like whole wheat. To autolyse, simply let your dough rest in the bowl under a wet towel.
Salting
Salt is added to dough not only for flavor, but also because it tightens gluten and limits the reproduction of microflora.
When salt is added, the gluten tightens up, plugging any holes in the “balloons” so that gluten is able to trap gas more effectively. We wait until after autolyse to add salt because tight gluten is the last thing we want when we’re trying to get all the amino acids lined up.
Salt also draws moisture away from yeast and lacto-bacteria. The right amount of salt slows fermentation to a manageable pace. However, too much salt can prevent bread from rising properly. Salt usually makes up 1.8%-2.2% of a recipe.
To ensure that salt is fully incorporated into the dough, save a bit of water that you would have added in the initial mix to dissolve the salt before mixing it in. Fold the saltwater into the dough after autolyse until the mixture is homogenous.

Bulk fermentation
Bulk fermentation is when your dough’s flavor and rise really develops. The entire mass of dough will be fermented together and you’ll periodically “turn” the dough to encourage gluten production.
Turning is also called the “stretch and fold technique.” Instead of kneading, you grab a corner of the dough, stretch it, and fold it over the rest of the dough. Imagine the corner you just grabed as the north point of a compass and then repeat the stretch and fold using the south, east, and west points. As you turn the dough, it will transform from a shaggy mess into a smooth, stretchy thing of beauty.

Turning helps strengthen and orient gluten and trap air in the dough. More turns result in more small and regular air bubbles while fewer turns leads to a loaf filled with larger, more irregular holes. Neither is necessarily right or wrong: a ciabatta loaf calls more irregularity while sandwhich bread will have a tighter, more regular structure. While folding and time increases gluten formation, dough can be overworked or overproved, causing gluten to break down. Stick to your recipe or experiment a bit to find out how much folding you prefer.

If you’ll be adding anything extra into your dough – nuts, seeds, dried fruit, or spices – now is a good time to add them. They’ll be distributed with each turn without disturbing the air bubbles that are forming.
Preshaping
If you’ll be dividing your mass of dough into smaller loaves, now is the time to do it. Turn the dough onto a well-floured surface and cut the dough with a bench scraper or knife. Do another set of north, south, east, west turns to form a loose shape, and let the dough sit until a wet cloth for twenty minutes or so to let the gluten relax before your final shaping.
Shaping
Before you shape your dough, prepare your proofing baskets. Choose a bowl, colander, basket, or pan that will cradle your dough so it stays in a nice round (or oblong) shape overnight. Find a dish towel that completely covers the inside of the container, spread it out on a flat surface, and generously rub flour into it. Don’t be afraid of going overboard; you should have a thick layer that stays put when you lift the towel up. Gently place the towel in the basket, flour side up.
To shape the loaf, do another set of north, south, east, west folds, sealing the last fold by pinching. Place in in your basket, seam side up.

Proving
Proving is where the final rise happens. Prepare your dough by placing it, basket and all, inside a large bag like a garbage bag. Twist the opening tightly shut and tie a knot to keep air out and moisture in. Now put the entire shabang in your fridge.
Dough is refrigerated – or “retarded” – over night because cool temperatures decrease the activity of yeast relative to that of the lacto-bacteria. In fact, yeast is ten times less active in a refrigerator than at room temperature. This gives lacto-bacteria time to produce flavorful lactic and acetic acid. Cooling the dough in the refrigerator before heating it in the oven leads to a dramatic gas expansion that creates a really open, irregular texture.
Retarding dough typically leads to great results, but it can still be overproved. In overproved dough, the gluten has broken down and the gas bubbles have popped. Bread baked from overprooved dough tends to be flat – because there’s not enough carbon dioxide left to make it rise – and may have a “flying crust” – because the gluten is not strong enough to maintain a good structure. It can be hard to tell if sourdough is corrected proved because it doesn’t rise as notably as commercially-leavened bread. In my experience, underproved dough performs significantly better than overproved bread, but it’s hard to know if you’ve overdone it until you bake.
Scoring
When it’s finally time to bake your dough, you’ve got to do a tiny bit of pretty prep before you stick it in the oven. Because the yeast is so active, there’s a good chance that the gas will blow a hole in the loaf if we don’t give it a nice, controlled valve to escape from.
Turn your loaf out of its basket by placing a piece of parchment paper and a peel over the basket and flipping quickly. Gently peel off the towel. As quickly as possible, score your loaf with a lame or a razor blade lets you control where the gas will go. You can go with a simple “X” shape, or design something a little more intricate.

Baking
To get a nice tall loaf, it’s critical that your oven is hot. As hot as it’s ever been. Shakira in “La Tortura” hot.

It’s also gotta be really steamy for the first half of baking. (Again, see “La Tortura” to properly understand the level of steamy.)
When starch is heated during baking, it absorbs water and swells in a process called partial gelatinization. In the oven, the gas bubbles continue to grow and stretch the loaf thanks to gluten’s balloon-y qualities – this creates the network of starch and protein filled with air called the crumb. At the same time, the starch molecules absorb moisture and grow so large that they touch. When the water evaporates, the starch molecules retain their shape, keeping the loaf from collapsing after we remove it from the oven – this creates the crust. Have you ever pasted paper-mache over a balloon? That’s precisely what happens here. After the balloon pops (after the carbon dioxide escapes from the loaf) the paper-mache(starch) keeps the round shape thanks to starch.
Steam is necessary to allow the gluten to stretch as big as possible before the starch dries out, gets hard, and prevents the loaf from growing. Extreme heat is important because it creates a dramatic rise and helps the starch gelatinize as fully as possible. After about half an hour, the steam is removed so that the starch can dry out, creating a nice crust.

So how to make all this happen? Commercial ovens get very hot and have special steam injection systems that produce perfect loaves. Unfortunately, they cost many thousands of dollars. We can replicate the effect with a few cheap tools. First, pre-heat the baking surface while you pre-heat the oven so that everything the dough touches is as hot as possible. While the best baking surface is a dutch oven or combo cooker, you can use a baking sheet or ceramic stone. Slide the loaf into the oven using the peel that it’s already sitting on.
Second, cover the loaf for the first half of cooking to retain moisture. If you’re using a combo cooker or dutch oven, cover the dough with the lid. If you don’t have one, turn a large pot upside down over the dough for a similar effect. After the loaf has grown as big as possible, remove the lid so that the crust can form.
Timing
Timing, while critical in both the fermentation and baking steps, can be a real pain in the pain (get it?!). I use spreadsheets and an app called Timeglass to keep myself from going crazy from trying to remember all the turns and timers and temperatures.
Spreadsheets
I don’t bake at the same time every week, but I usually want to plan ahead to make sure that I’ll be home and awake when I need to be. I create a timetable spreadsheet for each recipe that I develop that will auto-calculate the times when steps need to be taken so that I can plan my baking.
In the spreadsheet below, you can experiment with different timetables by changing the time that you mix the autolyse. Try entering other times into Box C2 (the format is hh:mm:ss AM/PM). The rest of the steps – including fermentation and baking – auto-calculate in Column C so that you can plan your start time based on when the other steps will be most convenient for you.
In this spreadsheet, Column D shows how long after the previous step each step starts. Column E shows the formula used to autocalculate Column C. Because I’ve set column C to display time, I have to make calculations taking into account that in this calculation, 1 = 1 day. Since 1 day is 24 hours, Hours are calculated by multiplying the number of hours by 1/24. For example, the mixing step happens 2 hours after the autolyse; this means that mixing is autolyse + 2 * (1/24) (shown in Box E3). Since 1 day is 1,440 minutes, minutes are calculated by multiplying the number of minutes by 1/1440. For example, the shape step happens 20 minutes after the the divide and preshape step; this means that mixing is divide and preshape + 20 * (1/1440) (shown in Box E11).
You can make your own spreadsheet or edit your own copies of mine if you find that more or less time works better for you.
Timeglass
Timeglass is an app that lets you create multi-step timers that you can use over and over each time you bake a recipe. It keeps you from having to remember to set a thousand timers for each step every time you bake. Trust me when I say that you’re bound to forget to set a timer or two between all the folding and handwashing that you’ll be doing.
The free version lets you create up to three reusable timers, but you can upgrade for $2.99 and make as many reusable timers as you want. I create separate reusable timers for fermentation and baking so that I’m not in trouble if I forget to preheat exactly 24 hours later.

When creating timers, keep in mind that, unlike the spreadsheet, the name of the step in time glass corresponds to the length between this step and the next step. For example, mixing happens 2 hours after autolyse but 5 minutes before fold 1 so Autolyse is a 2 hour timer while Mix is a 5 minute timer.
