
I am OVER writing papers, y’all. I just counted and in the past year, I’ve written 39 papers. If all this paper writing has taught me anything, it’s that efficiency and organization is what gets you through it all without losing your mind.
Do you know how many amazing sources I’ve lost because I can’t remember where I wrote them down? Do you know how many times I find myself flipping through the Bluebook to figure out whether book titles are italicized or small caps (or neither??)? I know I’m not the only wishes they could just hyperlink everything and be done with it.
Over the past couple dozen papers, though, I’ve figured out a way to keep my thoughts straight(ish). Using some of my favorite media and google docs, I’m gonna teach you how I use spreadsheets to keep my ish in order. You can use this method for any citation format, but I’m going to teach you with APA because I’m not about to Bluebook something for fun. And while it seems like it’s all about citations, it’s really the best way I’ve discovered to keep my writing flow going.
1. Set up a spreadsheet for your sources
Spreadsheets are your friends. They organize tons of information with little effort on your part and that’s exactly what you need when you’re jumbling tons of dates, authors, links and — OH YEAH — trying to turn it into a coherent paper.
Each row in your spreadsheet with be a different source and each column will give you a little bit (and sometimes a lotta bit) of info about the source. Here’s how to set it up:
Column 1 – numbers
The beautiful thing about using a spreadsheet is that you can assign a reference number to each source. When you’re writing your paper, there’s no need to stop your flow to look up a source or format a citation. You know that “Frida en el JARDÍN” is source 5, and that’s all you need for now.
“Why can’t you just use the row numbers automatically built into the spreadsheet?” You’re wondering? Because, dear cream puff, the numbers won’t stick themselves to the right sources.

See, if you want to sort your source list by year to find the most up-to-date data source, the sources will jump around, but the numbers will stay in 1, 2, 3 order. This makes your source list totally useless when you go back later to plug in the properly-formatted citations .
Column 2 – Link
If you’re using online sources (and I know you are), here’s where the URL goes. Spreadsheets automatically hyperlink URLs, making them easy to click when you need to check something in a source.
One hot tip: if you’re using a database like EBSCOHost, don’t use the URL that pops up in your browser. It won’t take you anywhere once your databased session expires after an hour or so. I put the database and DOI here so they’re easy to find in the future.
Optional columns – Author, title, year, notes
Depending on what I’m writing, it can be helpful to have the names of the author and source. More often, though, it’s good to have the year the source was written in my spreadsheet. When you’re got a proposition supported by two separate documents, one from 2016 named “Aztec Gold: Watch The History And Science Of Popcorn” and one from 1999 named “Harry Potter and the Prisoner of Azkaban”, it’s good to know that “Aztec Gold: Watch The History And Science Of Popcorn” is the one you should go with. On a related note, if you can think of a propositions supported by both of those sources, I salute you.
Most of the time, I use the notes column to write “WASTE OF TIME” for sources that I’ve read through and decided aren’t going to do me any good. I don’t delete the sources from my spreadsheet because a) there have occasionally been times where WASTE OF TIME sources end up being useful when my papers take an unexpected direction and b) if the source really is useless, I don’t want to waste my time by reading it again, so I leave myself a reminder.
Third to last column
Here’s where you put the type of source you’re dealing with. If you’re not sure, take a mo’ to familiarize yourself with the system that you’re using.
For example, when I’m writing social work papers, I use APA. The most common APA source types I use are e-books, online periodicals, online newspapers, and websites. When I’m writing a law paper, I list sources by bluebook rule. So for cases I write “10,” for books I write “15,” and so on.
This column comes in handy when you’re working on the next column: long citations. Using the spreadsheet’s “sort” feature, you can group all the books (or 15s) together so that you can cite them all at the same time. I know that my brain goes hazy trying to remember what’s italicized where, so doing all my books before moving onto periodicals saves me some brain power.
Second to last column – Long Citation
This is what it’s all about ladies and mints. Once you’re written your whole paper (or reached a writers block and need to stretch your left brain a little), take all the time you need to make perfect citations.
Last column – Short Citations
This is the plug and chug column. Once your paper really is done, you’ll copy and paste this part into each reference number you left in your paper. For APA, this is where you write “Miller Griffith, 2014”. For Bluebooking, this is where you write “supra note 5, at 41″.
More formatting
Don’t forget to get rid of extra columns and rows if that’s the kind of thing that bugs you to have lingering around. In fact, do you have you? Do you have to? Do you have to let it linger? They make scrolling more difficult and are better to just dump in the trash right now.
How to: Highlight all the rows or columns you want by clicking the first, holding down “shift,” then clicking the last. Right click (or two-finger click on a Mac) and select “Delete columns/rows #-#.”
Freeze the top row so that if you’ve got more sources than can fit on the screen, the column names are visible no matter how far you scroll down.

How to: View > Freeze > 1 row
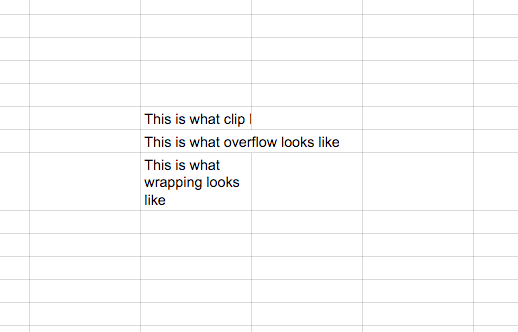
Format the spreadsheet so it’s easy to read. I “clip” almost everything except for title, which I “wrap.” Wrapping making the cell as long as it needs to be to fit all the information in while clipping makes any text longer the cell invisible until you double-click on it. At the very least, it’s best to clip link because links can get megalong and you just don’t need all that nonsense, you just need to be able to click on it. I always stay away from “overflow” because it makes it hard to see what cells are missing information.
How to: Select the whole sheet by clicking the grey box in the top left corner. Select an entire row or column by click the grey box to the left or top of that row or column. Formal > Text wrapping > [clip/wrap]
2. Use the Asterisk Method for Pre-Citing
Remember how we gave each source a reference number? This is what you’ll use while you’re writing you’re paper so that it’s easy to go back and plug short sources in later using the “find and replace” feature.

But wait! The “find” feature isn’t really all that smart. If we’re searching for reference number 7 later, find will also pull up and replace every “7” in the paper. To fix this problem, I add an asterisk before every reference number to ensure that only the reference numbers will be replaced. This works with multiple citations too; if you write (*2; *9) in your paper and then find and replace all the *2 and *9s, you’ll end up with (Harr, 2015; Kreider, 2012).
The down side to this is alphabetizing (APA) and order of signals (Bluebook). Don’t worry; we’ll fix that in step 6.
3. Cite your Sources
Start by using your “type” column to group sources by type. Start with your favorite (or least favorite if you like getting the hard stuff over first) and work your way through statutes, periodicals, books, and cases one by one.
To make this easier, I have a document that lists the rules for each source type so that I don’t have to reinvent the wheel (aka look at Purdue OWL or relearn my Bluebook) every time.
There are a few things that your magical citation spreadsheet just won’t do, so use placeholder symbols before an after italic, bold, and small caps formatting so that you can easily change it later. You can use my recommended symbols or your own, just make sure it’s something easy to remember and something that won’t show up in other parts of your paper.
- ~Italic~ Because the tilde makes me think of Spanish and in English books, Spanish words are always in italics.
- ^Bold^ Because bold text jumps up at you.
- =Small-caps= Because capital and lower case letters are equal height.
After you’ve written our your long citations, the short ones should be a breeze.
4. Plug in your Short citations
Find your reference numbers and replace them with your perfectly-formatted short citations. If a reference number doesn’t show up in your paper, go ahead and delete that source so that it doesn’t show up in your APA reference list.
How to: Edit > Find and replace or Ctrl/Command+H
5. Create your reference list (APA)
Alphabetize your source list by sorting the long citation column in your spreadsheet.

How to: Right click the grey square that says “long cite” and select “Sort sheet A > Z”
Copy and paste the long citations into your paper. You’ll probably have to do this one at a time to avoid pasting in a table.
6. Give your paper a once-over
Before turning in your paper, you need to make a few final manual changes.
- Bold, italic, and small-caps formatting won’t paste from your spreadsheet into your paper, but never fear! You added placeholder symbols to make making these changes easy. Find all your ~italic~ symbols and manual change the text between them to italic. Do the same with bold and small-caps formatting.

How to: Ctrl/Command+F
- Check any citations that cite multiple sources to ensure that they’re in the correct order. For APA, this means alphabetical order. For Bluebook, this means following order of signals and then any other hierarchies.
- APA – For citations with more than two authors, APA requires that you list all the authors the first time, and use only the first author’s name followed by “et al.” in subsequent citations.
Bonus Tip: Have a Filler Symbol
This paper-writing method is all about going with your flow. I try to keep my flow flowing flowingly by using a filler symbol to mark when I can’t think of a word or am having trouble getting the phrasing right so that I don’t get too stuck on it. When you have a moment to go back, search for that symbol and do the research or thinking you need to fill in the blank. I use “%” because I got used to not being allowed to use it in sociology papers as an undergrad.
You can use this same strategy for marking that you need a source to support a proposition.

N.B. Mey Rude wrote it, you guys! She’s brilliant and obvs said it much better!

I loved as much as you’ll receive carried out right here.
The sketch is tasteful, your authored material stylish.
nonetheless, you command get bought an impatience over that you wish be delivering the following.
unwell unquestionably come more formerly again as exactly the same nearly a
lot often inside case you shield this increase.
LikeLike