
You know how those nights go. You’re home alone, it’s late and you’re poking around on Netflix hoping to find a movie good enough to justify staying up until all hours of the morning. You eventually settle for the first decent looking movie with the word “lesbian” in the description, only to find yourself exhausted at work the next day, wondering why you thought it was a good idea to pass up sleep for travesty that is Elena Undone.
 That’s how I found Caramel. The thing is, though, it didn’t suck. It was cute, the characters were interesting and insanely pretty, and I learned something new: you can wax your legs with sugar! Instead of feeling cranky the next morning, I leapt of of bed like an overexcited kangaroo and ran to the grocery. Three failed attempts and a melted candy thermometer later, I finally managed to make something usable.
Making caramel takes time and a little finesse. There are two ways you can go with it: the semi-solid, silly-putty route (like in the movie) or the painted-on liquid avenue. Today I’m going to teach you how to make the liquid version. The recipe is a little more forgiving because the temperature doesn’t have to be quite as precise for it to work, it doesn’t require nearly as much patience to use and you can easily bottle up your leftovers to use next time.
There’s something weirdly satisfying about waxing. Yeah, it’s time-consuming and messy, but it’s also a pretty fun way to spend an hour with yourself. That’s not to say it’s for everyone. Lots of people like shaving and lots of people like keeping their hair attached to their body and both of those things are more than fine. I’m okay, you’re okay.
But if waxing’s your thing (or might be your thing), start your crafty little engines. We’re talking honey-colored kitchen science candy that costs less than your tip at a salon.
Sugar Wax
Ingredients
- 2 cups of sugar
- 1/4 cup of water
- 1/4 cup of lemon juice
Cooking stuff
- 2 sauce pans
- 1 microwave safe jar
Waxing stuff
- 1 light-colored 100% cotton t-shirt
- 1 knife
- 1 bowl
Instructions
- Clean everything. If there’s anything in your pan or on your spoon, this horrible process called recrystallization can occur. It ruins everything and causes giant sugar clumps to form.
- Pour the sugar, water and lemon juice into a big sauce pan and turn the heat on medium-high.
- Fill another sauce pan with water and boil it along with your wax. You’ll use this to clean the sticky mess out of your other pan a the end.
- After stirring just enough to get all the sugar wet, stop! You can put a lid on the pan (the condensation will force sugar stuck to the sides to slide down into the boiling liquid), use a wet pastry brush to keep sugar off the sides, or swirl the pan, but don’t even think about stirring.

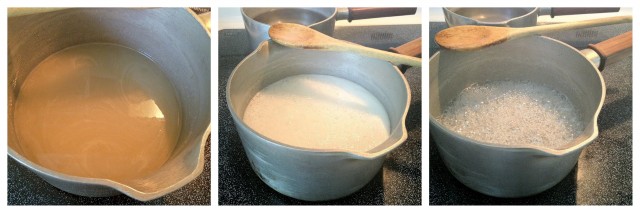
- First, the sugar water will turn white and foamy, but eventually it’ll turn clear and bubbly again before it starts to brown.
- If you’re using a dark pan, it’s hard to tell when the sugar water has changed into caramel. You could go out and buy a white pan or a candy thermometer, or you could just stick with the stuff you’ve got and count. Scoop up a spoonful of the stuff and count how long it takes for the bubbles in the spoon to disappear. You’ll know you’ve got the right consistency when the liquid in your spoon bubbles for three full seconds. Another way to tell is by scooping a little bit of the liquid onto a white plate to see what color it is; you’re aiming for a light honey color. A word of warning: this’ll happen a lot quicker on a gas stove than an electric stove.
- When the color’s right, pour the caramel into a microwave safe jar and then immediately pour your boiling water from the other pan into the dirty pan. It’ll save you a ton of time when you go to wash the dishes later.
Use
- If you’re using the caramel right away, give it about an hour to cool down so you don’t burn yourself. If you’ve stored it, heat it up in the microwave for about 30 seconds or warm it up in a double boiler.
- Fill the bowl with very hot water. This is where you’ll throw your strips when you’re done using them. The hot water starts dissolving the wax right away so that when you go to wash your strips when you’re finished, you don’t have much work to do.
- Cut your fabric into strips. Mine are roughly 2″ x 3″, although I don’t try very hard to keep them uniform; I always end up needing one or two weird shaped pieces. I use a t-shirt because jersey knits don’t fray as much as normal fabric so I can wash my strips and reuse them. I use a light colored fabric because a) a lighter color means less dye and fewer dark fuzzballs sticking to me and b) I get to see how much hair comes off and that fills me with a twisted sense of delight.
- Make sure whatever skin you’re waxing is clean. Dirt, sweat and dead skin will keep the wax from sticking to hair.
- Grab a dollop of wax, smooth it against direction grain (the thinner the better), wait 10 seconds or so, slap on a fabric strip and the rip it off in the direction that the hair grows.
- You can reuse a strip a few times, but once it’s spent, toss it in the hot water.
- Lather, rinse, and repeat. (Minus the later and rinse.)
