
Ever since I was little I’ve loved making “lotion potions.” My cousin and I would hunt through my grandma’s drawers, pulling out every hotel-sized lotion, soap and shampoo we could find. We’d grate the soap, mix up the lotions and sometimes even add a spritz of my grandma’s perfume – Eternity, which my grandpa still buys for her every year on her birthday – to make our creations smell good. Now that I’m all grown up (and have my own drawers full of stuff), I still love mixing up potions. There’s just something magic about taking whatever I can find and turning it into something that can clean, heal or beautify.
Soap is no exception. I started making my own soap last year for Christmas. It seemed easy enough and I wanted to give my brothers shaving brushes and soap. I ended up with 15 extra bars that I gave to my grandmas. They loved how soft it made their hands and so I, being the queen of dry skin all winter long, started making it for myself.
Equipment
An apron or old clothes
Non-latex gloves
Protective eyewear
Kitchen thermometer
Disposable or reusable container
Kitchen scale
Stick or hand-held mixer
Two stainless steel bowls
Mold for soap
Ingredients
Your ingredients will depend on your recipe. Generally, you’ll need lye (sodium hydroxide) and oils.
Recipes
Instructions
Let’s be real: soap making can be dangerous. You’re messing with a highly-corrosive substance and should avoid coming into contact with it. As long as you take normal precautions, though, it’s nothing to be afraid of. Use stainless steel bowls so that your lye won’t eat through or react with them. Open the windows while you mix the lye water. Don’t make soap while kids (or adults) or pets are running around and might bump something. Wear gloves and glasses and old clothes just so nothing accidentally touches you. Clean up with vinegar to neutralize any bits of lye afterwards. As long as you follow the instructions, there’s nothing to worry about and the world is your homemade soap oyster.
1. Soap making is all about the mise en place. Get all your materials out and measured before you even think about combining stuff. We measure everything by weight and not volume so that we’re sure we’ve got enough fat to react with the lye we’re adding in. First run your recipe through a lye calculator just to make sure you’ve got everything right. My favorite calculator is from The Sage and lets you easily make adjustments to recipes you find depending on what you’ve got in your cabinet. For example, most recipes call for palm oil (something I never have); I just substitute coconut oil for palm oil and plug in my values to a calculator and I’m good to go. I go for 5-6% excess fat so that my resulting bars are nice and moisturizing without being too oily. Pick whatever value you’d like as long as you stay within the green range on the chart.
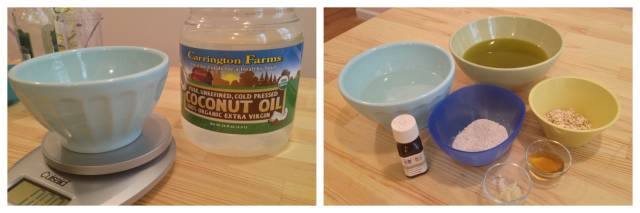
Don’t forget to tare!
When you measure the lye, make sure you’re using either a disposable container or a container that you only every plan to use for lye.
If you’re using a mold that isn’t easily removable, you’ll want to prepare it by lining it with saran wrap or parchment paper. I like to use silicon baking molds because they peel off, but you can use anything from capped PVC pipe to cake pans to cardboard boxes.
2. If your oils are solid, melt them in the big stainless steel bowl. When the oils reach 110°F, take them off the stove.
3. Pour your water into a stainless steel bowl. Pour the lye into the water. You always want to pour lye into other substances – and not the other way around – to avoid a “lye volcano.” The solution will heat up and give off fumes; try not to breath them in too much and wait until the solution cools down to 110°F.
4. Pour the lye water into the oils. Now it’s time to stir. You want to stir stir stir stir until the mixture reaches this mysterious and elusive phase called “trace.” Actually, it’s not that mysterious or elusive and it’s not a hard as people make it out to be. All trace means is that the lye water and the oils aren’t going to separate after they’re sitting for some time. With a stick or handheld blender, this usually takes about 10 minutes. You know you’re there when there’s a thin coating on the sides of the bowl and the blender. Trace will vary with different oils, but when you’re making a soap with a high olive-oil content, trace it going to look a lot thinner than cake batter.

Almost to trace
5. When the soap has reached trace, you want to add any superfats, essential oils, and additives. Stir it all in and then pour it into your mold.
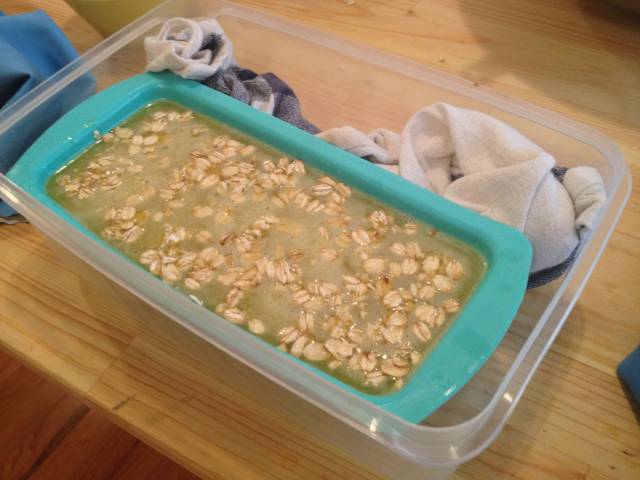
If you’re using a silicone mold, you can give it some support with towels.
6. Place the mold in a box (cardboard or otherwise) and wrap it in a towel to set overnight. Don’t seal the lid if it’s plastic! The box and towel insulate the soap à la mother hen while it’s curing. If you get cold, put the whole fandango on your lap; it’ll keep you warm!
7. The next day, remove the soap from the mold. It should be set but still soft, so now’s the time to slice!

Silicone peels right off
8. Place the bars back in the box (again, not sealing it if it’s plastic!) and let it sit for a whole month. I know, the wait’s hard. I write the date I made the soap and the date it’ll be ready on a label so that I’m not tempted to use it too early. During this time, the water we used to dissolve the lye will evaporate so the bar gets harder and any leftover lye will saponify so that the soap is safe to use.

Like butta
Before using your soap, you should test to make sure it’s safe to use. Many soap-makers recommend the tongue test (stick your tongue on the soap and see if it zaps you). Considering that most of y’all probably consider your tongue one of your primary sex organs, I do not. You can buy phenolphthalein indicator solution for about $3 at a pool store or a winemaker’s store and it’ll do the same thing.

Beautiful job with this!
LikeLike
Hello mate nnice blog
LikeLike